2.12.10

Working for the (top triple) Clamp Down

I really struggled for a pun there.

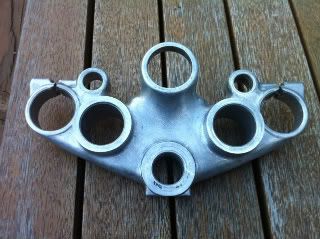
Anyway, top triple clamp stuff is going well. A few days ago I purchased some VHT grey primer and some gloss enamel engine paint to have a shot. Figuring that if it went badly then I'll just strip it back again.

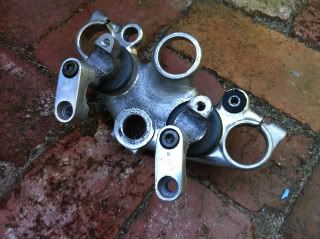
After two light coats of primer.


I masked off the inside of the forks and stuck two scews in so i'd be able to move it around the yard when painting it, and hopefully it'd block the threads too. Same goes for the ignition mount.


It actually looks pretty good for a first attempt. As per the instructions the can I'm going to wait seven days and give it a final coat. I'm not too sure if I should clear coat it or something like that. Some people are telling me I should be sanding between coats and stick it in the oven or something like that but it seems to be going okay so far*.

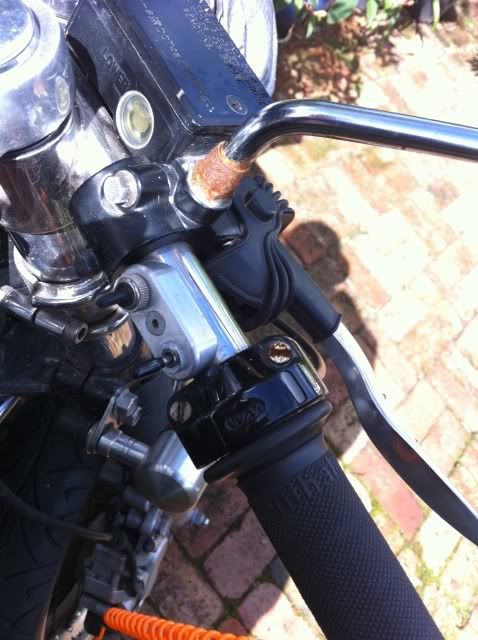
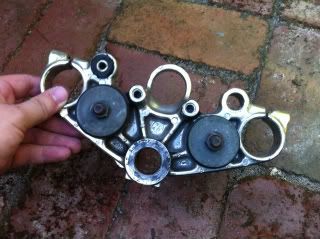
As an aside I've ordered some handlebar mounts for the clamp as well as I've managed to lose my immaculate ones that are... well, I don't know where they are. They're in pretty ratty condition so i've started sanding them back with some degreaser on 800 grit wet and dry and they're going well. I gave them a rub with some 1200 grit to finish with some autosol and they've got a bit of a sheen to them.

Turns out they're coated in some kind of lacquer...


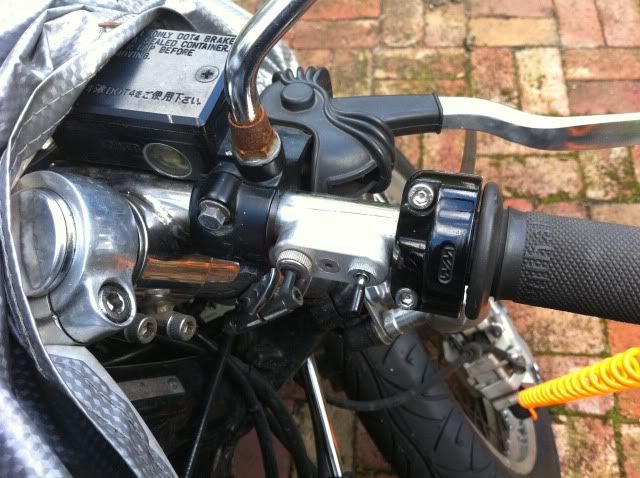
One I refinished on top, the lower one I haven't had a shot at yet.


And the good one from above.


Looks okay! I wonder if I should clear coat these? I'm going to paint some more of the fittings, but other than that, progress seems to be going pretty well.

*That usually means I'll stuff it, when I don't listen to other people.

22.11.10

Top Triple Clamp

Long story short - I'm probably going to be changing my bike back to a more upright position. So, first up, a triple clamp to mount standard bars to! I'm going to strip it and paint the thing gloss black so it matches the bottom clamp.


After a bit of a scrub with some 800 grit sandpaper and a bit of degreaser it started looking a lot more like something ready for paint:


The underneath of the clamp is an absolute bastard to sand. There's lots of gummed up little nooks and crannys and I know prepping this end for paint isn't the biggest priority, but hey, if a job's worth doing...


I spent plenty of time stuffing about with tiny bits of sandpaper and trying to find a dremel bit somewhere between 'polish' and 'cut triple clamp like butter'. Then I remembered! The Dishwasher!

Photobucket


I've also got to decide whether or not I want to keep the ring for the ignition unit and stick a clock in there or something or just grind it off. Hmmm.

30.9.10

Valve Clearences

Besides vainly watching the top of my head on the teev last night I did actually do something constructive yesterday. The valves have been sounding a little loud lately so I figured I'd check check them.

Everything off and ready for action:


With the flywheel cover off to find TDC I had a chance at how my rust prevention technique of some gear oil after a light sanding worked. Seemingly well:


There was some oil that'd gathered at the bottom of the cover.


With the feeler gauges in. 0.4 inch intake clearance and 0.7 outlet clearance with the new cam.


One more thing I've somehow misplaced, the retaining bolt for the fuel tank. There's also a bit of surface rust in there too. Any ideas on how to patch this up?


I didn't start it out after I'd done it, but I'm curious if it's stopped the valve noises. The inlet clearence was a tiiiiiiny bit lose and the exhaust needed a bit of a tighten. I've got a little bit of a routine downpat for doing valves and the whole thing takes around 20 minutes allowing for my usual faffing about, losing feeler gauges and misplacing spanners.

29.9.10

Shooting Rockets and Neigbours.

I'm going for a new job at the moment that has around 4 stages to go through before you get an offer. I've done the typical group interview, a typing test, had to look things up in a street directory and listen to some fascinating, yet slightly upsetting phone calls.

Anyway, yesterday I went to an Audiologist for some testing. I've got more than a bit of a passing interest in what they do as my sister is profoundly deaf and at one stage of my pathetic career I used to sell PPE. We had a talk about high risk activities that can put your hearing in danger and each time I told him about something he'd ask some very pertinent questions about it.

Q: Are you involved in any shooting or hunting activities?
A: Yep.
Q: What bore?
A: Large - military service rifle.

Anyway, we had a talk about firearms and exposure to firearms discharges and pressure waves and things like that. As it turns out, don't stand behind a Carl-Gustav anti-tank rocket launcher because when it goes off at around 180db it'll suck out your earplugs.

Anyway, going down the list of potential-for-deafness warnings was motorcycling, whereby he asked if I rode with a full face or open face helmet, and if I wore ear protection. He recommended ear plugs for all riding. As many of you guys would have noticed already during long rides a loud exhaust not only sends you deaf but really affect your levels of concentration. He told me about some studies that showed how prolonged exposure to industrial noise, comparable to those when riding, will shorten your attention span and interestingly, your temper.

You learn something new every day. Always ride with ear plugs, never stand near a bloke firing an Carl-Gustav and never expect anything interesting from one of my posts.

Oh, and last night, lookee who was on neighbours!


Nice... er... head eh?

More interestingly:


Well, I was pretty chuffed. Two Harleys being used to frame a Yamaha.

27.9.10

Oops.

During the usual ebay search I came across this interesting SR. It's certainly different but there's something else that caught my eye. You win something very small and very boring if you can guess...


Yep, the tuning fork logo is upside down. That'd really shit you up the wall if you'd done that.

7.9.10

Sprocket Cover

Hello Again!

Just another quick collection of images... most of these have been pulled from the fantastic http://yamahasrxtphotooftheday.blogspot.com/


Some interesting ideas. More to come as I find them.

6.9.10

SR400 vs. SR500 Fuel Tanks

Things have been pretty quiet on the SR front lately, so I've gone digging through my photo collection and found this nice comparison between the 400 and 500 fuel tank. Besides the obvious fuel cap change the 400 (On the right) holds a litre more of fuel.


On the same bikes, this this shows the difference between wheel sizes:

1.9.10

Pissed 'n Broke

God I've become lazy with the site lately!

I came across this the other night at the SR500 club meeting.


Now THAT'S what's technically called "Fucked".

Big time.

It was only noticed when the bike lost compression. But apparently the bike isn't in too bad nick apart from that. I'd have thought a bottom end flush out/fucked oil pump/rooted top end sort of thing might be called for, but there you go.

On another note the Pirelli Sport tyres that I've got on the SR are going well, now they're wearing in and I'm not falling off all the time.

25.8.10

Spotted...

I came across this the other day while meandering around.


Sometimes the simplest can be the best.

19.8.10

Czech this out!

I went for a brief ride with a couple of mates last week. One of which was Jim who was having a bit of trouble with his CZ.


Look at how easy MattB's bike kicks into life.

18.8.10

Bolting for It

Well!

Apologies for those who saw the blog over the last couple of days. I fiddled with the HTML settings, fucked up and threw my hands up in the air. It's not as though I had any good news to post anyway...

After having a shithouse month where my girlfriend of three years finally realised I was a bit of a dickhead I managed to drop the SR a week later, and cracked a few ribs. Entirely my own stupid fault.

I'd got some new tyres put on it and simply laid on the gas, not even thinking, as I left the shop. The back end slid out and I came down relatively lightly and at a low speed. And in front of a bit of an audience!

Anyway, the bike's mostly okay. The left rearset was ground down a little. The left clipon was pushed around a little which pushed the gauges together and bent them out of shape a little.

And that's about it!

In other, more cheerful news I replaced some rusting screws on my Daytona throttle. I've got to keep on top of little things like this because more than blackened spokes, dull sidecovers or scratched fuel tanks nothing looks worse than a rusty fastener.

Before:


And After:


I'm also swapping a few over. There's a local store, Metro Bolts Richmond, who stock all sorts of funny sized bolts and don't have a minimum. I picked up a few stainless socket-headed bolts and I'll have to head back there to get some assorted boxes of bolts for the future.

I also ordered a mirror from Japan, which turned out to be the wrong one - silver and not chromed. In the meantime the existing bloody mirror won't come out. Out again tomorrow to have a shot at getting it off again...

3.8.10

SR400 Front Brakes

I dug this up a little while ago while ago. It's got plenty of information regarding front brake upgrade options and interestingly, the history of the SR's front brakes.

http://srx6blk.hp.infoseek.co.jp/SR/SR-DiskBrake.htm

Turns out the current SR400 brake assembly and hub, in true Yamaha style is actually lifted from the XVS400.

Learn something new every day...

27.7.10

Looking into Mirrors - Part II

After a fair bit of procrastinating I've taken the plunge and gone with Mark's recommendation - Daytona BSC mirrors. So hopefully I'll able to see something other than my elbows.

It looks like they sit fairly low on the bike and Mark said they have good visibility, aside from when the speeds pick up and they vibrate. Not all that different from my current mirrors.

Take a look at them mounted on his annoyingly good looking SR here.

26.7.10

Big Bottom

When I first started looking at wider wheels and better tyre choices I wasn't a fan of it's looks. But after I looked at more and more and more I started to love what it did to the profile of the bike, the wide choice of tyre options it opens and the view from behind...


Lovely stuff. The guys on the SR500 forum have been answering some of my stupid questions and they seem to say that changing to 17"s was the best handling change they made to their bikes. I think they were coming from the bike 19" loops, but hey, most new sportsbikes run 17" rims, so there's gotta be something to it anyway.

http://www.sr500forum.com/forum/viewtopic.php?f=8&t=1674&start=20

And some more examples...


It's not all that often the Japanese will relace a wheel. Most of the time they seem to do straight swaps with XJR400's or something similar, changing swingarms as well as mags. That way they seem to be pushing 4.25-4.5 inch rims and that opens up Pilot Powers and all sorts of stuff.

When they do change rims the standard sizes appear to be 3" fronts and 4" rears. Any wider than around a 140 rear and you start to get clearance problems with the chain.

I found the one below on a blog somewhere. This one is actually running a 110 front. It looks like they've just laced the rear 18" wheel to the front. Makes sense actually, but you'd be losing out a little by not changing it to a 17" as well.

And here's a bit of a more traditional style cafe SR with the wider rims...


Hmm.
Anyway, half out of curiosity and half with the intention of changing my bike over to wider wheels i'm doing a bit of research about building some wheels. Thankfully I've got a mate who has built a fair few over the years while racing motocross who would be able to help me out.
Either I can spend a couple of hundred bucks up front and get a set of DID rims and stainless spokes from Japan and use my hubs...
Or alternately, and maybe more likely, I'll start searching around for some SR400 front and rear hubs that I'll tidy up, get powdercoated/painted and start looking for some cheapo stainless spokes and 36-hole rim. I'll have to do some more research on what spokes etc, but if I've just got a spare set of hubs sitting around I can do it in my own time.
More musings on tyres and wheels coming shortly.


20.7.10

#Neighbours, everybody needs good Neighbours#


Tomorrow I'm one of ten going to Mont Albert to be in a scene from Neighbours. I saw an ad somewhere for males aged 25-35 and with naked bikes for a bit of paid extra work for a day and a half. So I'm off!

As I sit here, throwing poses at the mirror and practising laughing at Toadfish's hijinks I have to reflect upon my acting career thus far.


IMDB Entry for Marlon Slack (Draft)

1997-2002
ABC1 ANZAC Day Ceremony
Slightly chubby 13 year old cadet later becoming a scrawny 18 year old Leading cadet in the AIRTC. Marlon was seen struggling to carry the banner for the ever diminishing ranks of the RAAF Signals Group during the annual ANZAC day march.

-Hiatus-

2008
Channel 9 News, Channel 10 Nightly News, SBS World News Tonight, ABC News, SKY News
Featured in the background of an evening news report on the steps of the Magistrate's court as some bloke pushed cameramen around. Marlon was eating a Snickers bar at the time.*

2009
The Einstein Factor
Lost spectacularly in front of the whole nation on his special topics of "Military Small Arms of WW2". He was competing against an expert on "The Princess Bride" and "The Work of Bon Jovi".

In-House Corporate Video
A as-yet unreleased production in which Marlon featured as a satisfied customer. For this role Marlon drew upon years of study of Brechtian theatre and Stanislavski acting theory to hold a phone while smiling.


Hmph. Less than impressive! Ah well, it's a bit of fun and I might get my ugly nut on the tele.


Autographs by application.


*During my lunchbreak I'd walk around the block and walk in and watch committal hearings for shits and giggles.

19.7.10

Bar-Ends and Top Caps

I've picked up some toys for the SR from Vanem:

Fork Top Caps


Bar End Weights


And inside the packet:


A little allen key - a nice touch. Even more surprisingly, it didn't round the screws when I installed them. I'm guessing the smaller rubber is for bars with a smaller ID. Buggered if I know how to install them correctly, but I just screwed them in and that seemed to work. I'm guessing the screws squish up the rubber which expands to hold the inside of the clipon. Seems to work...


I took the bike out for a 4-odd hour run up to Flowerdale/Yea/Broadford today and the weights have made a difference. Not a whole world of change but they've certainly taken the sting out of the vibration. I think the feel would be greatly improved with some thicker grips.

The top caps just pushed in. I've seen a fair few top caps that are were heavily rusted. Next chance I get I'm going to pull the caps and put a bit of oil/grease down there to prevent this happening in the years to come. I think it makes a huge, huge difference to the look. So much so it's got me rethinking the gauges again. Ha.


For something so easy to install, there's a hell of a lot of instruction.


Maybe there's something important in there?

As a sidenote, today I was seeing how long I can last on the bike before getting some real pain, and about three hours into it I felt a stab in my upper left shoulder. This has been happening for the last year or so I've owned the bike. Before then I was doing 10-12 hours without too much pain. So I'm going to have a play and maybe try something closer to the standard seating position. Having a Cafe racer is great... but it'd be even better if I could ride the thing!

4.7.10

My bike on the Dyno

Someone organised a dyno day where for $20.00 you get a run and a A/F readout. It was run atDynobike in Morabbin.

After running sportsbike after sportsbike he opened the door of the sound proof booth and saw the SR. "Jesus, will it make it?" he laughed and said something about finding a helmet for when it goes bang.

But it didn't, and here's the vid!


Original link is here.

And the same run in high-def, if you're that way inclined.

Results? 34. something horsepower. And I'm pretty bloody happy with that. The guy there said a standard WR450 puts out the same. And that's a four valve, liquid cooled, DOHC short-stroke motorcrosser. Mine's an air-cooled SOHC 30 year old dirtbike.

(Now we won't say what happens to the WR450 when you start to let it breathe better. Let me have my moment in the sun.)

1.7.10

That seals it - I've forked up!

Well, last weekend I changed the fork seals on the bike.

And I got to use a grinder.

Strange mix really. Usually the two things go hand in hand but as always one or two little challenges reared their head.

I did the work at my girlfriends house, which is a large building in Melbourne that's undergoing some renovations. I was lucky, nae, blessed with the use of a good work bench and a vice for the weekend and I shudder to think of going back to work without one.

Due to having to do the whole thing I was a bit under the pump having to get the bike in and out of the place by the end of the day and I'm not happy with the job I've done. So I'll do it again one weekend... oh well.

I put the SR up on the Harley Cruiser stand that I'd bought from Anderson, choked it up with some bricks as the weight was biased forward a bit and went about undoing the pinchbolts that held everything together at the front. All 8,000,000 of them.

Forks came off beautifully, I drained the oil into a bucket and a bit on the the floor and put everything in the vice. I'd been to alltools where I had multiple orgasms looking at the shiny tools there and picked up a 50cm extension of my ratchet and a 17mm hex head.


Everything was in the vice but...

... The socket wouldn't fit inside the inner tube.

So it was upstairs to play with a grinder to take a bit off the outside.


Lovely stuff.


The whole setup basically looked like this:


Everything turned easily and with a few swift pulls the whole thing came apart neatly.


And here's a similar pic, showing the order in which it sits when mounted.


So from top to bottom is the fork seal, the spacer, the bushing and at the bottom sits another bushing which I didn't remove.

Anyway, here's the parts all laid out. Not in the correct order, of course. I managed to stuff up what could have actually been a helpful picture.


So here's where things get interesting. The All-Balls fork seals that Deus sent didn't seem to be the same as the OEM ones that were fitted.


So, long story short... with the spacer the new seals would sit above the recess for the retaining bolt.

To give you an idea, this is how it all fitted together when I started:


Get my drift? So, it's one of two things. It's supposed to fit without the spacer. Or it's the wrong seal.

Running short of time I went the first option. I haven't had the chance to test it yet, but on Saturday I'll be motorbiking around and should know if it's worked, but in the hackjob I did forcing them in I'd be surprised. A fork seal driver is next on the list.

So, class, what did I learn this week?

A vice and a good bench makes all the difference.
As does the right tool.
A fork seal driver would be a good investment.
A need a bloody garage.

I'll pick up some OEM fork seals shortly. I know it should be okay mounted how it is at the moment, but I don't like changing things from standard.

Yeah, shutup. You know what I mean.